How to Implement a Login Module in Next.js with Supabase
title: "How to Implement a Login Module in Next.js with Supabase" date: "2026-09-30" excerpt: "A step-by-step walkthrough of building a login module in Next.js App Router with i18n and Supabase — Google OAuth, email OTP, and the auth callback route." tags: ["nextjs", "supabase", "auth", "i18n"] cta: "https://stacktechlab.dev" ctaText: "More posts like this"
In the last post I covered subdomain-based i18n. This one is the natural follow-up: how to actually build the login module on top of that i18n skeleton.
The stack is the same: Next.js 16 App Router, Supabase for auth, and our own tiny i18n layer (lib/i18n/). No auth library, no UI kit — just the pieces you need.
By the end you'll have:
- A
/loginpage that reads copy from the i18n messages object - A Google OAuth button
- An email OTP flow (send code → enter code → sign in)
- An
/auth/callbackroute that handles the redirect from Supabase
Step 1: Build app/login/page.tsx
The page itself is a Server Component. It just renders the form.
// app/login/page.tsx
import LoginForm from './LoginForm'

export default function LoginPage() {
    return (
        <main className="flex min-h-screen items-center justify-center bg-[#0a0a0f]">
            <LoginForm />
        </main>
    )
}
Step 2: Build app/login/LoginForm.tsx
The form is a Client Component. It needs to be, because it:
- Manages local state (email, loading, error)
- Calls Supabase auth methods
- Reads i18n messages via the
useI18n()hook
// app/login/LoginForm.tsx
'use client'

import { useState } from 'react'
import { useI18n } from '@/lib/i18n/client'

export default function LoginForm() {
    const { messages } = useI18n()
    const t = messages.auth
    const [email, setEmail] = useState('')

    return (
        <div className="w-full max-w-md rounded-2xl border border-white/10 bg-[#14141a] p-8">
            <h1 className="mb-2 text-center text-3xl font-bold text-white">
                {t.welcomeBack}
            </h1>
            <p className="mb-8 text-center text-sm text-white/50">
                {t.welcomeDesc}
            </p>

            <button className="mb-4 w-full rounded-xl border border-white/10 bg-[#1c1c24] py-3 text-white hover:bg-[#23232d]">
                {t.loginWithGoogle}
            </button>

            <div className="my-6 flex items-center gap-3 text-xs text-white/30">
                <div className="h-px flex-1 bg-white/10" />
                <span>{t.or}</span>
                <div className="h-px flex-1 bg-white/10" />
            </div>

            <div className="space-y-4">
                <div>
                    <label className="mb-2 block text-sm text-white/70">
                        {t.email}
                    </label>
                    <input
                        type="email"
                        value={email}
                        onChange={(e) => setEmail(e.target.value)}
                        placeholder={t.emailPlaceholder}
                        className="w-full rounded-xl border border-white/10 bg-[#1c1c24] px-4 py-3 text-white placeholder-white/30 outline-none focus:border-purple-500"
                    />
                </div>

                <button className="w-full rounded-xl bg-gradient-to-r from-purple-600 to-fuchsia-600 py-3 font-semibold text-white shadow-lg shadow-purple-600/30 hover:opacity-90">
                    {t.sendCode}
                </button>
            </div>
        </div>
    )
}
A few things worth pointing out:
LoginForm.tsxis a Client Component ('use client').- It reads messages through
useI18n(), which is fed by theI18nProviderinapp/layout.tsx. - Every string —
t.welcomeBack,t.loginWithGoogle,t.or— maps to anauth.*key inlib/i18n/messages/base/en.json. - Because this is a Client Component, this step also proves that the i18n layer works on the client side, not just on the server.
Step 3: Visit /login to verify
npm run dev
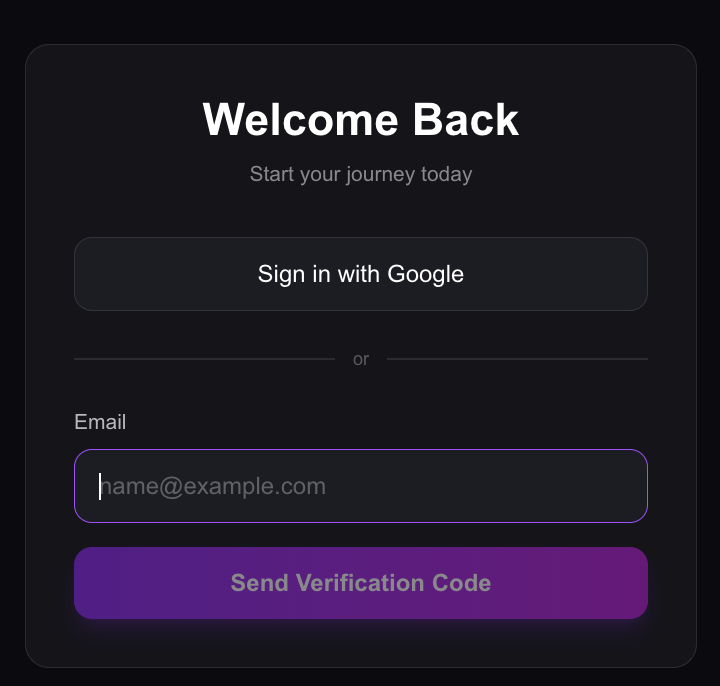
Open http://localhost:3002/login. You should see the login card with:
- "Welcome Back" / "Start your journey today"
- "Sign in with Google"
- "or"
- "Email" input
- "Send Verification Code" button
If all strings render correctly, the i18n + form layer is done. Now let's wire up the actual authentication.
Step 4: The Supabase Browser Client
You almost certainly already have this from your Supabase setup. It looks like:
// lib/supabase/client.ts
import { createBrowserClient } from '@supabase/ssr'

export function createClient() {
    return createBrowserClient(
        process.env.NEXT_PUBLIC_SUPABASE_URL!,
        process.env.NEXT_PUBLIC_SUPABASE_ANON_KEY!
    )
}
The key detail: call createClient() fresh inside each handler. Don't cache it at module level. This is the standard @supabase/ssr pattern.
Step 5: Wire Up Google OAuth and Email OTP
Replace app/login/LoginForm.tsx with this fuller version:
// app/login/LoginForm.tsx
'use client'

import { useState } from 'react'
import { useI18n } from '@/lib/i18n/client'
import { createClient } from '@/lib/supabase/client'

export default function LoginForm() {
    const { messages } = useI18n()
    const t = messages.auth

    const [email, setEmail] = useState('')
    const [loading, setLoading] = useState(false)
    const [message, setMessage] = useState('')
    const [error, setError] = useState('')

    // ---------- Google OAuth ----------
    async function handleGoogle() {
        setLoading(true)
        setError('')
        const supabase = createClient()
        const { error } = await supabase.auth.signInWithOAuth({
            provider: 'google',
            options: {
                redirectTo: `${window.location.origin}/auth/callback`,
            },
        })
        if (error) {
            setError(error.message)
            setLoading(false)
        }
        // On success the browser is redirected to Google, so we never reach here
    }

    // ---------- Email OTP ----------
    async function handleSendCode(e: React.FormEvent) {
        e.preventDefault()
        if (!email) return

        setLoading(true)
        setError('')
        setMessage('')

        const supabase = createClient()
        const { error } = await supabase.auth.signInWithOtp({
            email,
            options: {
                emailRedirectTo: `${window.location.origin}/auth/callback`,
            },
        })

        if (error) {
            setError(error.message)
        } else {
            setMessage(t.codeSentTo.replace('{email}', email))
        }
        setLoading(false)
    }

    return (
        <div className="w-full max-w-md rounded-2xl border border-white/10 bg-[#14141a] p-8">
            <h1 className="mb-2 text-center text-3xl font-bold text-white">
                {t.welcomeBack}
            </h1>
            <p className="mb-8 text-center text-sm text-white/50">
                {t.welcomeDesc}
            </p>

            {/* Google button */}
            <button
                type="button"
                onClick={handleGoogle}
                disabled={loading}
                className="mb-4 flex w-full items-center justify-center gap-2 rounded-xl border border-white/10 bg-[#1c1c24] py-3 text-white hover:bg-[#23232d] disabled:opacity-50"
            >
                {t.loginWithGoogle}
            </button>

            <div className="my-6 flex items-center gap-3 text-xs text-white/30">
                <div className="h-px flex-1 bg-white/10" />
                <span>{t.or}</span>
                <div className="h-px flex-1 bg-white/10" />
            </div>

            {/* Email OTP form */}
            <form onSubmit={handleSendCode} className="space-y-4">
                <div>
                    <label className="mb-2 block text-sm text-white/70">
                        {t.email}
                    </label>
                    <input
                        type="email"
                        value={email}
                        onChange={(e) => setEmail(e.target.value)}
                        placeholder={t.emailPlaceholder}
                        required
                        disabled={loading}
                        className="w-full rounded-xl border border-white/10 bg-[#1c1c24] px-4 py-3 text-white placeholder-white/30 outline-none focus:border-purple-500 disabled:opacity-50"
                    />
                </div>

                <button
                    type="submit"
                    disabled={loading || !email}
                    className="w-full rounded-xl bg-gradient-to-r from-purple-600 to-fuchsia-600 py-3 font-semibold text-white shadow-lg shadow-purple-600/30 hover:opacity-90 disabled:opacity-50"
                >
                    {loading ? t.sending : t.sendCode}
                </button>
            </form>

            {/* Feedback */}
            {message && (
                <p className="mt-4 text-center text-sm text-green-400">{message}</p>
            )}
            {error && (
                <p className="mt-4 text-center text-sm text-red-400">{error}</p>
            )}
        </div>
    )
}
Two auth paths are wired up:
- Google OAuth —
supabase.auth.signInWithOAuth({ provider: 'google' }). On success the browser navigates to Google, then back to/auth/callback. - Email OTP —
supabase.auth.signInWithOtp({ email }). Supabase sends a code. The user pastes it in the next step.
You'll notice the email flow returns a "we sent a code to..." message but the form doesn't yet have a field to enter the code. That's the next step in the full flow — see the follow-up section below.
Step 6: The Auth Callback Route
When OAuth or a magic link returns to your app, Supabase redirects to /auth/callback?code=.... You need a Route Handler to exchange that code for a session.
Create app/auth/callback/route.ts:
// app/auth/callback/route.ts
import { NextResponse } from 'next/server'
import { createClient } from '@/lib/supabase/server'

export async function GET(request: Request) {
    const { searchParams, origin } = new URL(request.url)
    const code = searchParams.get('code')
    const next = searchParams.get('next') ?? '/'

    if (code) {
        const supabase = await createClient()
        const { error } = await supabase.auth.exchangeCodeForSession(code)
        if (!error) {
            return NextResponse.redirect(`${origin}${next}`)
        }
    }

    return NextResponse.redirect(`${origin}/login?error=auth`)
}
Notes:
createClient()here is the server client fromlib/supabase/server.ts— it reads/writes cookies, which is how the session gets persisted.exchangeCodeForSession(code)is the crucial call. It swaps the one-timecodefrom the URL for a real session, written as a cookie.- On success we redirect to
next(default/). On failure we bounce back to/loginwith an error query param.
Full Email OTP Flow (Two Steps)
The snippet above only sends the code. To complete the login you also need a step where the user enters the 6-digit code and you call verifyOtp.
const { error } = await supabase.auth.verifyOtp({
    email,
    token: code,
    type: 'email',
})
If error is null, the user is signed in. router.push('/') plus router.refresh() sends them home with a fresh server-rendered session.
Verifying the Login
After the user signs in (Google or email OTP), open DevTools → Application → Cookies. You should see a cookie named:
sb-<your-project-ref>-auth-token
That cookie is the session. On every subsequent request, the Supabase server client reads it and you can call:
const { data: { user } } = await supabase.auth.getUser()
from any Server Component to get the current user.
What's Next
Once login works, the natural follow-ups are:
- A user menu — show the signed-in email and a logout button in the navbar.
- Route protection — redirect unauthenticated users away from
/dashboard(or whatever your private pages are). - Session refresh in
proxy.ts— make sure Supabase tokens get renewed on every request.
That's the whole login module: one page, one form, one route handler, and the i18n you already had.
If you're building something similar — or if you've found a cleaner pattern for Supabase auth in Next.js App Router — I'd love to hear about it.